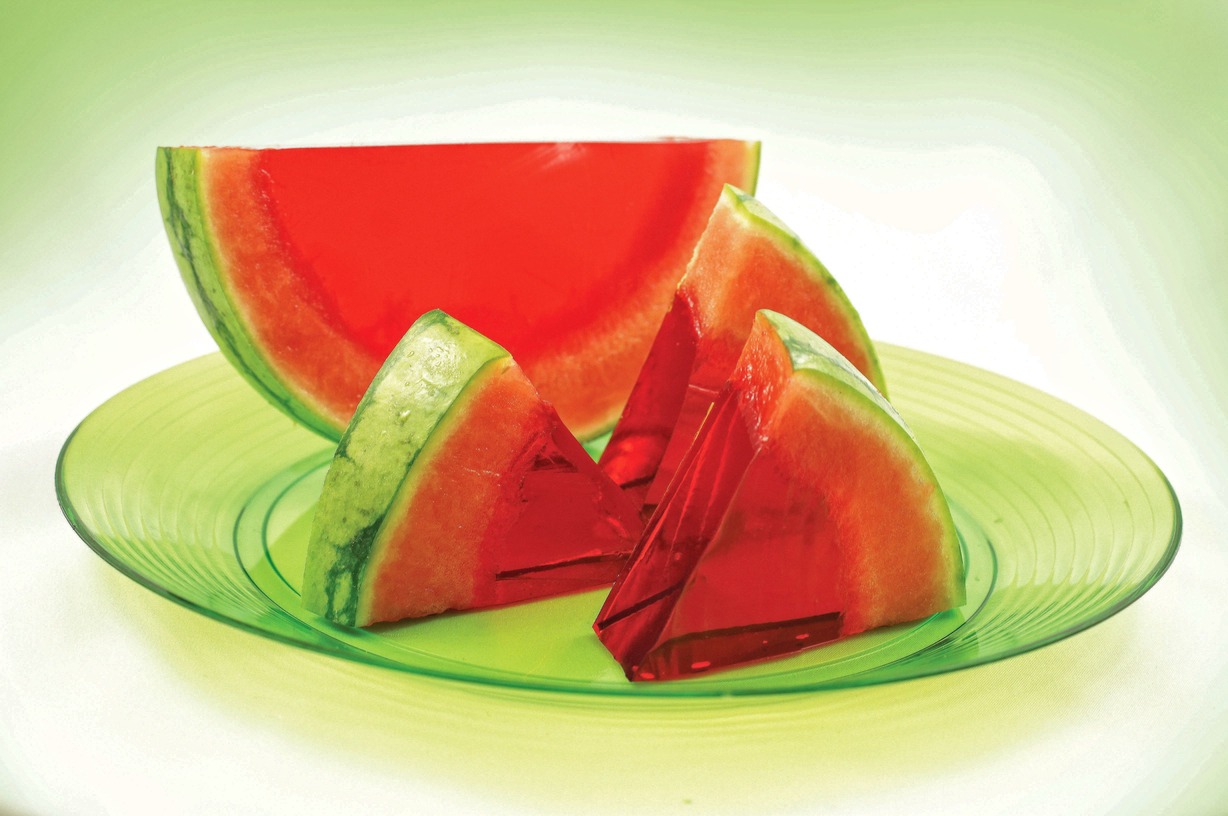
Blogs

Author: Carol Eide

Jellomelon
Ingredients Small Seedless Watermelon 2 Small (3 oz.) Boxes of Strawberry Jello 2 Envelopes of Knox Original Unflavored Gelatine 2 Cups Hot Water Large spoon or melon baller Large bowl A Sharp Knife Safety Note: Please ensure safe handling of the knife during preparation and slicing. Directions Begin by peeling your bananas. Once peeled, slice each banana lengthwise. Begin by cutting your small seedless watermelon in half. Aim for a watermelon that's approximately 5-6 pounds for best results. Using a large spoon or melon baller, carefully remove most of the watermelon flesh. Leave a small layer of red flesh on the inside of the semi-circle for aesthetic appeal. Make sure the interior of the watermelon half is as smooth as possible. Set the removed watermelon flesh aside to enjoy separately. In a large bowl, sprinkle the envelopes of Knox over hot water. The water should be nearly boiling to properly dissolve the gelatine. Stir until all lumps have dissolved. This step ensures that your jello mixture will set with a thicker consistency. Add the Strawberry Jello powder to the gelatine mixture. Stir until the mixture is smooth and the jello powder is fully incorporated. Carefully pour the jello mixture into your prepared watermelon semi-circle. To ensure stability, place the watermelon half in a small baking dish or a bowl before filling. Be cautious not to overfill, which could cause the jello to spill in the refrigerator. Place the filled watermelon half in the refrigerator and allow it to set until firm. This will take approximately 3 hours. Once the jello is set, carefully slice the Jellomelon into wedges using a sharp knife   Serving Size: This will vary based on the size of your watermelon and the thickness of your slices. Idea Watermelon works great, but don't stop there. You can create an amazing summertime picnic platter by experimenting with a variety of different fruits and jello flavors. What's your favorite fruit? Consider how it might pair with jello—orange with orange jello, lime with lime jello, or even cantaloupe with lemon jello. The possibilities are endless! However, keep in mind that the texture of the chosen fruit will affect the final result, with firmer fruits generally holding the jello better. Enjoy your exploration of flavors!   For a fun and festive presentation, consider serving your Jellomelon slices or Jello shots with fresh berries or a dollop of whipped cream. This unique and refreshing treat is sure to be a hit at your next summer gathering! Enjoy responsibly. For Adults For a creative twist, adults can modify this recipe slightly to create Watermelon Jello shots. Simply replace part of the hot water with vodka when preparing the gelatine and jello mixture. Remember to keep this version out of reach of children!  
Read More
Citrus Berry Blast
Ingredients 1 cup fresh lemon juice (approximately 5–6 large lemons squeezed and strained) 1 cup granulated sugar Strawberries, cut into large chunks Lemons, cut into circles—3–4 circles for each tumbler Water Ice 1-gallon pitcher or plastic jug with a watertight lid Clear tumblers Cutting board and a sharp knife Strainer Safety Note: Please ensure safe handling of the knife during preparation and slicing. Directions Squeeze and strain lemons to get 1 cup of fresh lemon juice. Pour the lemon juice into the pitcher. Add 1 cup of granulated sugar to the pitcher. Fill the pitcher halfway with water. Secure the watertight lid onto the pitcher. Shake the pitcher vigorously until all the sugar has dissolved. Then, add more water until the pitcher is full, and shake again. (At this point, you can taste the lemonade and adjust the sweetness or tartness by adding more sugar or lemon juice as desired. Stir well after any adjustments). Chill the lemonade in the refrigerator. Cut additional lemons into circles and strawberries into large chunks. Fill each tumbler half full with the diced strawberries and 2–3 lemon circles (reserve one circle of lemon for each tumbler as a garnish). Add ice and pour in the chilled lemonade. For each tumbler, make a small cut on one side of the remaining lemon circle, and slide the lemon circle onto the edge of the tumbler for a lovely garnish.   Serving Size: This recipe makes approximately 1 gallon of lemonade, the number of servings will depend on the size of your tumblers.   Optional: Consider adding fresh mint for an extra refreshing twist, or replace some of the water with sparkling water for a fizzy version. Enjoy your homemade fresh lemonade!  
Read More
Crafty Countryside
Ingredients 1 candle jar 22 clothespins 1 paint stick Spray paint (optional) 2 empty tuna cans 1 empty 4 oz. can (like a chili can) 1 votive candle Hot glue Decorative tags Small flower plant Directions Open two tuna cans and one 4 oz. can, remove contents, and wash thoroughly. Dry the cans completely. Place the votive in the center of one tuna can and the 4 oz. can in the center of the other. Plant a small flower in the 4 oz. can. If you want to color your clothespins, spray one side of them with paint, let dry, then turn over and spray the other side. Let them dry completely. Using hot glue, attach approximately 22 clothespins along the circumference of the tuna cans to create the picket fence effect. You can alternate between painted and natural clothespins for an interesting look. Attach decorative tags to the front and rear of the can for a charming touch Fun Tip Choose either spray paint or acrylic paint to color your 'picket fence.' Opt for classic white for a traditional look, or experiment with your own color choices to make the craft truly unique.
Read More
Summer Splash Footwear
Ingredients Inexpensive flip-flops 300 water balloons String or thin ribbon Directions First, prepare your balloon bunches. Take three water balloons and tie them together using a piece of string or thin ribbon. Next, tie the bunch of balloons onto the flip-flop strap using a double knot for security. Make sure the knot is tight, but not so tight that it might burst the balloons. Repeat this process, adding more bunches of balloons until each flip-flop strap is fully covered. Remember, you can easily slide the balloon bunches up and down the strap until you achieve the desired look. We used approximately 150 water balloons per flip-flop, but you can adjust this number depending on the size of your flip-flops and how full you want the straps to be.   Safety Note: Do not inflate the balloons. Balloons, especially when inflated, can be a choking hazard for young children. Always supervise children when they are wearing these flip-flops.  
Read More
Splash 'n' Toss Sponge Bombs
Ingredients 3 sponges (preferably of different colors for a fun look) Strong string Ruler Scissors Safety Note: Please ensure safe handling of the scissors during preparation and be careful when throwing the sponge ball. Directions Cut each sponge lengthwise into strips that are approximately 1/2 inch wide. You should end up with 5 strips from each sponge. Arrange the sponge strips into a rectangle, alternating the colors for a delightful look. Lay the strips side by side until you have a rectangle that is 3 strips high and 5 strips wide. Take a piece of strong string and tie it around the center of the sponge rectangle. Pull the string as tightly as you can without tearing the sponges, then secure it with a double knot. Trim the ends of the string. Manipulate the sponge strips by pulling and tugging on them until you achieve the desired circular shape. Now your sponge ball is ready for play! Dunk it into a bucket of water or a pool, and have fun throwing it around. Remember to always throw gently and safely.   Fun Tip Create sponge-war teams with single-colored sponge balls for each team and engage in a fun-filled water war! Let your kids mix colors just for fun, adding a personal touch to their team's sponge bombs.  
Read More
Palm Tree Fruit Plates
Ingredients Kiwis Bananas Tangerines Plate Knife Optional: Oranges (as an alternative to tangerines) Grapes (to represent 'coconuts' on your palm trees) Safety Note: Please ensure safe handling of the knife during preparation. If children are participating, adult supervision is recommended. Directions Begin by peeling your bananas. Once peeled, slice each banana lengthwise. Arrange the sliced bananas on your plate to form the trunks of your palm trees. Make sure to place them in a way that resembles the elongated, slightly curved shape of a palm tree trunk. For added detail, slice the bananas crossways lightly without cutting all the way through. This will give your palm trees a segmented look. Now, it's time to make the palm fronds. Carefully peel your kiwis with a paring knife, taking care to remove the skin while keeping as much of the flesh intact as possible. Once peeled, slice the kiwis lengthwise. Arrange the sliced kiwis at the top of your banana palm trunks. Place them in a way that they fan out, resembling the fronds of a palm tree. Lastly, peel your tangerines and separate the sections. Scatter these around the base of your palm trees on the plate, creating the appearance of sandy ground.   Remember, this recipe is flexible! Feel free to experiment with different fruits for variation. Oranges can be a great substitute for tangerines, or consider adding grapes as 'coconuts' on your palm trees.   Estimated Preparation Time: 15-20 minutes Serving Size: This will vary based on the size of your plate and the number of 'palm trees' you wish to create.   Enjoy eating your Palm Tree Fruit Plate or bring to a Hawaiian Get-Together. This fun, creative snack is a wonderful way to encourage healthy eating for kids.  
Read More
filter

ARTICLES